Wednesday, December 17, 2014

Positioning Computer monitor or Laptop Monitor/ Desktop Monitor

Why should we worry about positioning the monitor?

The monitor is an integral part of a computer workstation. When placed in the wrong position it can force the operator to work in a variety of awkward positions. Working with one's chin tilted upwards, and the head and upper body bent forwards or sideways is common wherever the monitor is improperly situated. Such forced working body positions significantly contribute to the operator's discomfort, and can potentially lead to work related musculoskeletal injury (WMSD). Other adverse effects of a poorly located monitor are eye irritation, blurred vision, dry burning eyes and headaches, collectively called eyestrain.
Common complaints among computer operators include discomfort, aches and pains in the neck and shoulder, but also eyestrain. The sheer number of such complaints indicates that the proper position of the monitor has not received enough recognition as an important factor in the arrangement of a computer workstation.


What factors decide the proper position of the computer monitor?

Postural discomfort and the consequent aches and pains result from the effort to view the monitor when it is set at the wrong place in relation to the operator's position. Two factors come into play: viewing angle and viewing distance. Viewing angle refers to the degree above or below an imaginary horizontal line at the level of the viewer's eyes and the centre of the object being looked at; in case of a computer work it is the centre of the screen. - See Figure i. Viewing distance refers to the space between the operator's eyes and the screen. - See Figure i. Clearly these factors are critical for correct placement of a computer monitor. A poor angle leads to postural (neck and shoulders) discomfort, while the wrong distance can contribute to eyestrain.
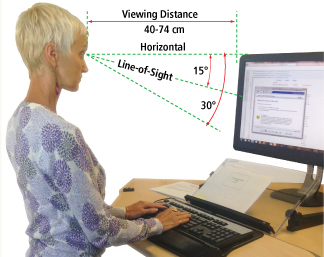
Viewing distance
Figure i
The existing guidelines and recommendations on both viewing angle and particularly on viewing distance differ, sometimes significantly from one another. For this reason they should not be taken as a commandment "carved in stone" but merely as guidelines. As such, they can be used as a starting point for tailoring any given situation.


What should you know while setting up an appropriate viewing angle?

Researchers agree that at rest, the eyes naturally assume a straightforward (see Figure ii) and downward cast (see Figure i) - a normal line of sight. How far downwards, however, is not clear. Experimental findings range from about 15 degrees to almost 30 degrees. People engaged in visually demanding tasks limit their downward eye movements to about half of the whole available range of 60 degrees.
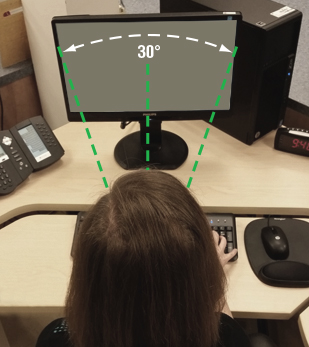
Eyes naturally assume straightforward
Figure ii
Therefore, for comfortable viewing of images on a computer screen it is probably reasonable to place the monitor at about 15 degrees (or slightly lower) below the horizontal line. Such a location creates a preferable visual zone of 30 degrees (+ 15 degrees to -15 degrees from the normal line of sight).
Numerous field studies among people doing intense visual work indicate that looking upwards (above the horizontal) is tiring. On the other hand, looking downwards, that is, lower than 15 degrees below the horizontal, was not reported as particularly fatiguing. This finding allows one to extend the visual zone downward by another 15 degrees (an acceptable visual zone) for a total of 45 degrees. See Figure iii.
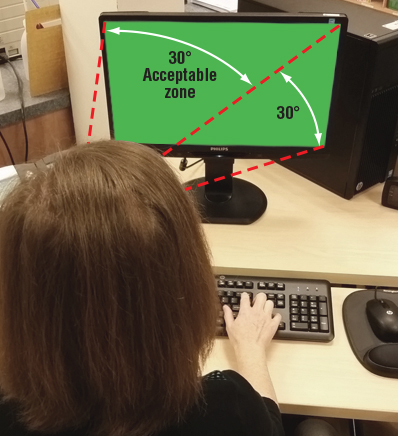
Acceptable visual zone
Figure iii

Warning one

Occasionally monitors are placed on top of the computing module commonly called CPU. A monitor located that high is a source of discomfort and, in the long run, can cause musculoskeletal problems in the neck and shoulder area. At a workstation where the desk and chair heights are properly adjusted, the monitor should be placed at the same level as the keyboard. The fact that discomfort caused by a monitor which is too high (above the horizontal) is worse than one which is slightly too low (below an acceptable visual zone) should be kept in mind while arranging a monitor at any workstation.

Warning two

When using a larger monitor (17", 19" or larger) or one that is oriented to the "portrait" position, make sure that the top of the screen is not at a level higher than the operator's eye.


What should you know while setting up (selecting) a proper viewing distance?

Looking at far distances does not cause eyestrain - it is the muscular effort required to focus on objects at close distances that strains the eyes. The distinction between "far distance" and "close distance" is never "razor sharp". It is not only individual but it also can change over time, for example, due to age.
Accommodation* and convergence** are the two main functions, which govern the viewing of objects at closer distances. The shorter the viewing distance, the greater the muscular effort required for accommodation and convergence, and which, in turn, increases the risk for eye discomfort. A greater viewing distance, on the other hand, eliminates the risk for eyestrain but can make the resolving of the finer images or characters displayed on the computer screen more difficult. Consequently, the right viewing distance is the one at which the computer operator can easily read the screen without experiencing eyestrain.
The eyes have a default accommodation distance, called the Resting Point of Accommodation (RPA) and a default Resting Point of Vergence (RPV). In practical terms, at distances greater than the RPA and RPV, there is no need for either accommodation or convergence. Under these conditions, individuals with perfect (20/20) vision or those with properly corrected vision are not likely to experience eyestrain (assuming they take appropriate eye "rest breaks" from focussing on the screen).
Numerical values of RPA -- around 75 cm (about 30 in.)-- and RPV -- around 80 cm (about 32 in.)-- are close to each other which makes setting the right viewing distance simple. The viewing range 40 cm to 70 cm (about 15 - 27 in.) provides visual comfort for majority of computer users. In the situation where the recommended viewing distance is too great for the operator to see images clearly it is better to increase the font size (images) than to force a shorter viewing distance.

* Accommodation is the automatic adjustment of the eye for focusing on near objects. The eyes achieve this by changing the convexity (or shape) of the lenses.

** Convergence is the automatic inward (toward the nose) turn of the eyes when viewing close objects.

***Correct your Monitor angel today and save your eyes and avoid unusual headache and other health problems.

Have a great day and Enjoy your life. Thank you :)

Monday, October 27, 2014

Android Pattern Lock and it's Solve

এন্ড্রয়েডে প্যাটার্ণ লকভূলে গেছেন?

৩টি সমাধান!!!

সমাধান-১ : এ কাজের জন্যে অবশ্যইসেটের ইন্টারনেট কানেকশনএক্টিভেটেড থাকতে হবে*প্যটার্ণটি অনুমাণ করে অন্তত:৫বার ইনপুট করুণ। এরপর একটি অপশনআসবে, “Forgot Pattern”?এটাতে ট্যাপ করুণ।*ট্যাপ করার পর আপনার গুগলএকাউন্ট অর্থাৎ জি-মেইলআই.ডি এবং পাসওয়ার্ড চাইবে।ঠিকঠিক মতো ইনপুট করুণ।*সফলভাবে জি-মেইল আই.ডিতে লগইনকরাশেষে আপনাকে নতুন প্যটার্ণ লকদিতে বলা হবে। নতুন প্যটার্ণ একটিভকরুণ এবং এবারে অবশ্যইসহজে মনে থাকে এমন কোন প্যাটার্ণড্র করুণ।

সমাধান-২: ইন্টারনেট কাণেকশনপ্রয়োজন নেইবার বার ভুল প্যাটার্ণ ড্র করারফলে অনেক সময় ছোটবাচ্চা অথবা বন্ধুদের কারণেওডিভাইস লকড হয়ে যেতে পারে। এসময়ে ডিভাসে ফ্যাক্টরী রিষ্টোরকরা ছাড়া গত্যন্তর থাকে না।এসময় হাতে ফ্যক্টরী রিষ্টোরকরতে হয়। জেনে নিন কিভাবে সিষ্টেমহার্ড রিসেট করবেন*প্রথমে নিশ্চিত হয়ে নিন যে আপনারডিভাইসে পর্যাপ্ত চার্জ মজুত আছে,যাতে প্রসেসটি চলাকালীন সেট বন্ধহয়ে না যায়।*ডিভাইস বন্ধ করুণ এবং চালু করারসময় Volume up & Down+powerbutton একসাথে প্রেস করে সেট অনকরুণ।এটা আপনাকে রিকোভারী মুডে নিয়ে যাবেরিকোভারী মুডে যাওয়ারজন্যে এটা ছাড়াও বিভিন্নকোম্পানীর সেটে আরো কিছু কম্বিনেশনকাজ করতে পারে সেগুলো হলো:
১।Volume Down + Volume Up +Power button.
২।Volume Down + Power button.
৩।Volume Up + Power button.
৪।Volume Up + Home + Powerbutton.
৫।Volume Up + Camera button.
৬।Home + Camera button.
৭।Home + Power button

আমি নিশ্চিত উপরের ৭টির যেকোনএকটি কম্বিনেশন কাজ করবেই:কম্বিনেশন দিয়ে ডিভাইস অন করার পররিকোভারী মুড এ যাবেন* “Wipe Data / Factory Reset” সিলেক্টকরুণ, এক্ষেত্রে ভলিউম আপ ডাউনকি দিয়ে সিলেকশনের কাজ করতে হবে।*এর পর নো এবং ‘ইয়েস’ এর মধ্যথেকে ‘ইয়েস’ সিলেক্ট করুণ। সিলেক্টকরার জন্যে ব্র্যান্ডভেদে পাওয়ারবাটন/হোম বাটন কাজ করতে পারে*সবশেষে সেট রিবুট করুণ, এবং কিছুক্ষনঅপেক্ষা করুণ।আজকের আমি কোনো সফটনিয়ে আসিনি … এসেছি লুকোনো কোডনিয়ে যা আপনার এন্দ্রয়েড স্মার্টফোন টিতে কখন লেগে যায় ,তা কি বলা যায় ? যাই হোক তাহলে শুরু করি …

সমাধান-৩ :lock স্ক্রিন এথাকা Emargency Call বাটন এ ক্লিককরুন এবং নিচের কোড টি টাইপ করুন ,এতে আপনার মোবাইল এরফেক্টরী রিসেট হবে এবং আপনার সিস্টেম আবার ইনস্টল করবে , তারমানে আপনার মোবাইলএকেবারে প্রথম রূপে চলে যাবে , সবডাটা চলে যাবে, কি আর করার ?ফোন তো আনলক করতে হবে নাকি ?কোড টি হলো >*2767*3855# [ এই কোড দেবার আগে বার বারভাবুন, কারণ এই কোড প্রেস করার পরকোনো confirmation চাবে না ]এর পর কল বাটন এ প্রেস করুন,আপনার মোবাইল একবার / দুইবার রিস্টার্ট হতে পারে | কিছুক্ষণ পর দেখুনআপনার মোবাইল সেটিংস এর কিছুসেটিংস কনফিগার করতে হবে , যেমন –ভাষা ঠিক করা, মেইল + পাস ঠিককরা .. ইত্যাদি ইত্যাদি …আরেকটি কোড আছে যেটি আপনারবর্তমান সিস্টেম ঠিক রেখে এবং SDকার্ড এর ফাইল যেমন – ছবি , গানইত্যাদি রেখে বাকি সব কিছুই রিসেটকরবে |

আমি সাজেস্ট করবো আগে এইকোড টি দিয়ে আপনারা চেষ্টা করুন ,তা না হলে প্রথম কোড টি ব্যাবহারকরুন -কোড টি হলো >*#*#7780#*#*

Sunday, October 26, 2014

Remove SHortcut Virus from your Desktop PC or Laptop

হঠাৎ করে দেখলেন কম্পিউটার শর্টকাট ফাইল-ফোল্ডারে ভরে গেছে। বারবার ডিলিট করেও এ থেকে মুক্তি মিলছে না। হুটহাট অনেক ফাইল-ফোল্ডার হারিয়েও যাচ্ছে। ইদানীং এই সমস্যায় প্রায় সবাই পড়ছেন। এটি কোনো ভাইরাস নয়। এ হলো VBS Script (ভিজুয়াল বেসিক স্ক্রিপ্ট)। এ যন্ত্রণা থেকে খুব সহজেই মুক্তি পেতে পারেন। নিচের ধাপগুলো অনুসরণ করুন।


CMD ব্যবহার করে
১. ওপেন CMD (Command Prompt – DOS)
২. নিচের কমান্ডটি হুবহু লিখুন
attrib -h -s -r -a /s /d Name_drive:*.*
এবার Name_drive লেখাটিতে যে ড্রাইভটি আপনি শর্টকাট ভাইরাসমুক্ত করতে চান সেটি লিখুন। যেমন: C ড্রাইভ ভাইরাসমুক্ত করতে চাইলে লিখুন attrib -h -s -r -a /s /d c:*.*
৩. এন্টার বাটন চাপুন
৪. এবার দেখবেন শর্টকাট ভাইরাস ফাইল ও ফোল্ডারগুলো স্বাভাবিক হয়ে যাবে। এবার ওই ফাইল ও ফোল্ডারগুলো ডিলিট করে দিন।
.bat ব্যবহার করে
Bat ফাইল হলো নোটপ্যাডে লেখা একটি একজেকিউটেবল ফাইল। এতে ডাবল ক্লিক করলেই চালু হয়ে যায়।
১. নোটপ্যাড ওপেন করুন।
২. নিচের কোডটি হুবহু কপি-পেস্ট করুন
@echo off
attrib -h -s -r -a /s /d Name_Drive:*.*
@echo complete.
৩. এবার Name_Drive এর জায়গায় ভাইরাস আক্রান্ত ড্রাইভের নাম লিখুন। যদি তিনটির বেশি ড্রাইভ আক্রান্ত হয় তাহলে কমান্ডটি শুধু কপি-পেস্ট করলেই চলবে।
৪. removevirus.bat এই নাম দিয়ে ফাইলটি সেভ করুন।
৫. এবার ফাইলটি বন্ধ করে ডাবল ক্লিক করে রান করুন।
৬. এবার দেখবেন আপনার শর্টকাট ভাইরাস ফাইল-ফোল্ডারগুলো সব স্বাভাবিক হয়ে গেছে। এখন সব ডিলিট করে দিন।
এছাড়া নিচের কৌশলও নিতে পারেন
আক্রান্ত পেনড্রাইভ থেকে বাঁচতে
১. RUN এ যান।
২. wscript.exe লিখে ENTER চাপুন।
৩. Stop script after specified number of seconds: এ 1 দিয়ে APPLY করুন। এবার কারো পেনড্রাইভের শর্টকাট ভাইরাস আর আপনার কম্পিউটারে ডুকবে না।
আক্রান্ত কম্পিউটার ভাইরাসমুক্ত করতে
১. কী বোর্ডের CTRL+SHIFT+ESC চাপুন।
২. PROCESS ট্যাবে যান।
৩. এখানে wscript.exe ফাইলটি সিলেক্ট করুন।
৪. End Process এ ক্লিক করুন।
৫. এবার আপনার কম্পিউটারের C:/ ড্রাইভে যান।
৬. সার্চ বক্সে wscript লিখে সার্চ করুন।
৭. wscript নামের সব ফাইলগুলো SHIFT+DELETE দিন।
৮. যেই ফাইলগুলো ডিলিট হচ্ছে না ওইগুলো স্কিপ করে দিন।
৯. এখন RUN এ যান।
১০. wscript.exe লিখে ENTER চাপুন।
১১. Stop script after specified number of seconds: এ 1 দিয়ে APPLY করুন।

ব্যাস, আপনার কম্পিউটার শর্টকাট ভাইরাসমুক্ত। এবার পেনড্রাইভের শর্টকাট ভাইরাসও আর আপনার কম্পিউটারে ডুকবে না।

Wednesday, June 18, 2014

Remove Malicious Code From Webpage Fast

Remove Malicious code from your webpage


Lets see how we can remove malicious program from our webpages.

Suppose you can see a malicious code like ‘eval(base64_decode’, To remove this malware go to server's secure shell and type bellow code, and see the malware is gone like a magic.

find -regex “.*php” -exec sed -i ‘s|<?php /\*\*/ eval(base64_decode(.*;?>||g’ {} \;

If you see such type malicious program attacks your webpage again later you can remove them manually also.

If you see any malware code that you have no idea what to do like this one:

<php /*versio:2.05*/if (!defined(‘determinator’)){$Q00=0;$Q00=pack(‘H*’,’62615636f6465′);eval($QQQ00(‘JELidRJy…………wPJ9IH0=’));}?><?php

Lets remove tsuch type malware to bring it to your local machine.

1st download your files from hosting site. you can use filezilla for this purpose.

Now download iscanner software to your local machine.
Open the software.

“tar -zxvf iscanner.tar.gz”

Now from iscanner-0.7 copy all files and keep them in  "filesystem/usr/local/sbin"


Now install RUBY to your local machine , download it and install it to your machine.

“sudo apt-get install ruby”


Now your iScanner is ready for use completely. Write iscanner to terminal and use it.

General use has been shown bellow:


WRITE THIS CODE:

“iscanner -f /home/user”


if you want to remove single file then write this code:

“iscanner -F /home/user/file.php”

If malicious code is not removed after trying all this methods the open .php page, copy malicious code and paste it to notepad.। Now run this code;

“iscanner -M /home/user/malware_code.txt -f /home/user”

Here, in this file you give input the exact name of the malware: malware_code.txt. YOu can confirm each and everypage by checking with this code manually to confirm that their is any malware left ot not.

If you can catch any malware then it time for its removal.
When you ran this code, “infected-10:52:24-11.Jul.log” then a log file automatically was created.


Now use this code to remove detected malwares.

“iscanner -c infected.log”

if you want to run the code unchanged then you have to change the name of log file as: infected.log

Thats all. Now you have to upload all your clean pages to web Host again.

Thanks all.
Enjoy your malware free clean website now.


Saturday, February 15, 2014

How to Set WaitToKillServiceTimeout to Speed Up Shut Down Time in Windows

Set WaitToKillServiceTimeout before Shut Down in Registry Editor
1. Press the Windows + R keys to open the Run dialog, type regedit, and click/tap on OK.

2. In regedit, go to: (See screenshot below)
HKEY_LOCAL_MACHINE\SYSTEM\CurrentControlSet\Control
Shut Down -Speed Up-regedit.jpg
3. In the right pane, right click on WaitToKillServiceTimeout, and click on Modify. (See screenshot above)

4. Type in a number between 2000-20000 (2-20 seconds), and click on OK. (See screenshot below)
NOTE: The default time is 12000 (Windows 7) or 5000 (Windows 8). I use 2000 (2 seconds) and have not had any problems. Your experience may vary.
Name:  Modify.jpg
Views: 14927
Size:  34.9 KB
5. If you like, you may also wish to change the HungAppTimeoutWaitToKillAppTimeout, and AutoEndTasks values to what you want.

6. When finished, you can close Registry Editor if you like.
NOTE: If you have problems with programs from your computer shutting down to quickly, then repeat the above steps and increase the WaitToKillServiceTimeout time (step 5) a bit. 

Enjoy...!!!

Friday, January 31, 2014

Download mozilla Firefox Update version (Offline Installer)

Download "Mozilla Firefox" Update version (Offline Installer)

Go to this Website and select your Language then click on download link. Soon the "OFFLINE" Mozilla Firefox Download will be started.


Have Fun, Enjoy...!!!

Wednesday, January 29, 2014

Speedup Mozilla Firefox (For all Version==100% Working)

How to speed up Mozilla Firefox

I think Firefox is my favorite browser and then it's Chrome.

My allegiance remains with Firefox because of the array of plugins (especially those that make web development easier), general browser responsiveness and native support for websites that are at the cusp of the CSS3 and HTML5 web movement.
Most of the time, Firefox is fast.  You really don’t have to worry about it: pages leap onto the screen, plugins load silently without a trace and tabs open and close on command.
But no web browser is perfect and sometimes even the best need a tune-up.  Even your gorgeous Nissan GTR (lucky you) will ineluctably need a tune-up.  Consequently, in this guide you should think of me as your personal digital mechanic for getting the most “mileage” out of your Firefox experience.
I’m going to show you five speed enhancing tricks:
  1. Reset Firefox
  2. Clear Cache
  3. Safe Mode
  4. Disable Extensions
  5. Advanced Configuration
Let’s get started.

1. Nuke the browser

If you’re in a hurry, don’t feel like thinking and just want a safe and sure way of speeding up browser performance you can easily return Firefox to its initial state.  Resetting Firefox returns the browser to the beginning.  The reset offers much of the benefits you would get from a complete reinstall without the wasted time.
In other words, the Reset saves your bookmarks, browsing history, stored passwords, cookies and web form auto-fill info but expunges your extensions, themes, tab groups and site specific preferences like download history and customizations.
To get started, in Firefox, press Ctrl + L to put the keyboard focus in the address bar - then enter this:
about:support
Suddenly the Troubleshooting information page is before you.  On the right side you’ll see a gray box with a big ol’ Reset button.
Reset Firefox and you’ll be on your road to browsing bliss.
Reset Firefox to Defaults

2. Clear Cache

This is almost as common as the generic “Reboot your computer” solution adored by tech support analysts.  But clearing the cache isn’t a perfunctory tip, in many cases it results in a palpable improvement in speed.
The cache is a temporary storage space for images, scripts and web elements.  As you browse the web the browser saves frequently accessed content to your local computer so subsequent visits to similar pages don’t have to wait for everything to download again; instead Firefox just pulls the content from the cache and then pops your favorite website on the screen.
Over time, the cache get’s full and data bloat manifests itself as a sluggish browser. To clear the cache press this key combo:
Ctrl + Shift + Del
You can restrict the time range to just today or to everything in the cache regardless of time.  For optimal results, I recommend using Everything and checking off all the options in the Detail list.  Let me explain what each setting does:

Clear Cache

Browsing & Download History

All the file history present in your download window will get purged.  It’s important to note this only clears the records of the files you’ve downloaded not the files themselves.  In addition, this flushes the websites that autocomplete as you type in the address bar and all the files listed in the History menu (Ctrl + Shift + h)

Form & Search Bar History

Any text typed into any web form or search bar will get erased.

Cookies

Cookies are little text files that save preferences from sites you’ve visited.   For example, if you’ve ever signed into Facebook or Twitter and checked “Remember me” those sites save a small bit of text in a cookie so the next time you visit them you don’t have to login.  That’s how the remember me feature works: it relies on cookies.  But that’s not all, Cookies are also used by plugins, such as Adobe Flash and sometimes third parties, to store and track your browsing habits.  You should definitely clear your cookies both as a general rule for maintenance and security.

Cache

Temporary web files like images and media reside in the cache.  Flushing the cache is like using drain-o on clogged pipes in your bathroom: it’s essential so data can flow to your computer again.

Active Logins

This closes any persistent authentication sessions that your browser has open.  If you’ve logged into a site that required HTTP authentication then clearing Active Logins, logs you out.  It’s good to do this because if you leave your computer unlocked then anyone can sit down and start browsing through your active web sessions impersonate you on Gmail, Twitter, Facebook, LinkedIn or any site you’re signed into.  It’s a good idea to erase this data so you can log you out of all these sites at once.

Offline Website Data

This is like cache on steroids.  Offline website data can store entire websites on your local computer so you can browse offline; as you can imagine this can slow your system down; therefore, it’s a good idea to erase it.

Site Preferences

Stuff like pop-up blocker exceptions are stored here.

Make Firefox Automatically Clear the Cache

After clearing the cache I suggest configuring Firefox so it automatically clears it for you every time you close the browser.  This will keep Firefox running smoothly in the future.
  • Click the big orange Firefox button in the upper left corner of the browser window, mouse over to Options then click Options in the menu fly out.
  • Click the little mask icon called Privacy then under history set the Firefox will setting in the drop down box to Use custom settings for history.
Clear Cache Automatically
  • Put a check in Clear history when Firefox closes
Clear Cache Automatically Settings
  • Click the Settings button near it so you can choose exactly what Firefox clears on exit.
Clear Cache Automatically Custom Settings
  • Click OK and you’re done.
Now Firefox will automatically clear your cache after you close the browser.

3. Run Firefox in Safe Mode

Holding down Shift while starting Firefox opens it in a special no-frills mode called Safe Mode.
If your browser runs faster in safe mode than normal mode then you know there’s an extension (add-on), theme, or plugin that is slowing it down.
Start Firefox in Safe Mode
TIP: As you can see, you can also Reset Firefox this way too.
Now it’s time to hunt down those aberrant extensions so you can disable them.

4. Disable useless add-ons and plugins

Click the big orange Firefox button again and choose Add-ons.
Plug-ins and Add-ons are mini applications that consume browser resources and can slow the browser to a crawl.  Some are better than others but if you find some you don’t need you should disable them.
If you’re worried that disabling one will break the browser just click the blue More link near the Disable button to get more information about it.  In most cases, disabling a plugin won’t render the browser useless so feel free to be dauntless.
Disable Firefox Add-ons
Disable Firefox Plugin-ins
You can also use Nils Maier’s excellent Firefox plug-in called about:addons-memory.  It actually shows you which plug-ins are consuming the most memory so you know which to disable.  You don’t even have to restart your browser after installing it.

5. Advanced Performance Improvements

Firefox gives users the ability to edit internal variables in a special configuration area.  You’ll see a warning message when you enter this area because if you don’t know what you’re doing, you can really flub up the browser, read the warning and proceed.
Here are three advanced variables that will squeeze out the last drops of performance from Firefox:
Press Ctrl + L to focus the address bar then type this:
about:config
Firefox about:config

Increase Persistent Connections

When downloading large amounts of data such as streaming audio from Pandora or HD video from Youtube, increasing your persistent connections will allow you to download more data at once.
In the filter box enter this command:
network.http.max-persistent-connections-per-server
Double click the preference and change the integer value from 6 to 8.
Firefox Persistent Connections

Increase Pipelining

Cranking the pipeline decreases the time it takes to load pages because Firefox has more channels to transport the data.
network.http.pipelining.maxrequests
Change the integer value to 40.
Firefox Pipeline Increase
Now we need to actually enable Pipelining, so far all we did was set the maxrequests variable but pipelining is actually off by default.

Enter this in the variable search box:
network.http.pipelining
Then double click the first entry to flip the Boolean value from false to true.
Firefox Pipeline Enabled

Disable Tab Animations

This is pushing it I know… but I want to be thorough so I need to mention it.
browser.tabs.animate
This won’t deliver blazing results but might make tab switching feel more fluid.
I keep mine enabled because it makes the browser feel obedient when I switch or open tabs.  It doesn’t hesitate, it doesn’t animate it just opens the tab and displays the page I want.

Bottom Line

Firefox has been a favorite for web developers and lovers of the Mozilla brand for years.  Maybe it’s the abounding plugin’s or perhaps it’s the fact that the browser is reliable and doesn’t crash often.  The engineers at Mozilla know how to build a good product and I hope this continues.  But the truth is even good products need maintenance and the five tips I offered in this article are a sure way to keep Americas favorite little fox happy.


Thursday, January 23, 2014

Get rid from "Spam Message"

◘◘◘ For Gmail
1. Login to Gmail and click the Setting button from upper right corner 
2. Click on  Filters
3. Click on Create a New Filter
4. New popup window will be arrived
5. Type   in:spam on the "Has the Words" box
6. Check mark  "Delete it and  Apply filter to"  and select Create Filter


Now when span message will be automatically deleted from your gmail

◘◘◘ For Yahoo! Mail
Select Option then go to Mail Options
Now go to General category
At lower side you will see  there is a box named "Automatically move spam to Spam folder" 

If it is not selected by tick mark then make it selected and save it. Thats all. 


For Yahoo! Mail Classic

From Yahoo! Mail toolbar  go to   Mail Options
Select "Spam Protection" just bellow of "Spam"
If SpamGuard is not on then make it ON
Save it. 


Sunday, January 19, 2014

How to Download Facebook Videos (Direct Download)

How to Download Facebook Videos (Direct Download)

1. Go to this web address:
http://howbees.com/2013/09/03/where-and-how-to-download-facebook-video-to-your-computer-online/
                                                                        OR,
                                                            Click HERE  
                                               OR,
                                            Directly From HERE


2. Paste your facebook video link
3. Press Downoad
4. Save Video to your drive
5. Enjoy...!!!

Wednesday, January 15, 2014

How to write Bangla/Bengali in Photoshop (100% Working)

You can easily write bangle in your Photoshop design with Avro software. To do so you have to follow few steps.

Bengali is most needing language for the graphics and Photoshop designers of Bangladesh as well as Kolkata, India.

We will see writing bangle in Photoshop with Unicode.

First of all turn on your Avro Software.

If you don’t have a Avro software Download it from here.


◘◘ Go to Avro setting pointed on image and click.
After clicking on that select ‘Output as ANSI’.

◘◘ Now turn on your Photoshop desired page and select the fort ‘Siyam Rupali ANSI’ pointed on below image.

◘◘ Yes! You are done!!!
Now just start writing bangle as you write by your Avro!
An example for you at below!
write bangla in photoshop

Now write on Photoshop (any version) with Bangla/Bengali and Enjoy...!!!

Monday, January 13, 2014

How to speed up Google Chrome (100% Working)

How to speed up Google Chrome (Working)

There are few things that can help you to make your browser speed faster than a stupid web browser that takes ages to load a simple webpage like digg.com or Slashdot.org.  Here’s a few things you can do that are guaranteed to boost your browser performance.

1. Turn on GPU compositing
Google has experimental options that can break the browser if you don’t know what you’re doing; however, turning on the GPU compositing experimental option forces the nerve center of your graphics card, known as the Graphics Processing Unit (GPU), to accelerate compositing onall web pages, not just those that need it like graphic heavy sites.  This will boost your load times by 1 to two 2 seconds.
Open Chrome and enter this in the address bar:
chrome://flags
Read the big red warning.  Take a deep breath then Scroll down to the GPU compositing on all pages option and change the Default option to Enabled.
Google Chrome GPU compositing on-all pages

2. Disable Plugins
Undoubtedly your copy of Chrome is running plugins that it doesn’t need.
Think of browser plugins like little applications that run in your web browser to enhance your web experience.  Common plugins are Adobe Reader, Adobe Flash, QuickTime Player, and Silverlight.  Each of these application consume memory and because they consume memory there’s less of it to go around for other tasks like watching that 1080p HD Youtube movie your brother sent you.
Open the address bar again and enter:
chrome://plugins
Since a lot of sites use Flash, you should keep Flash enabled but you can safely disable each of these plug-ins without killing your browser.  ‘In the graphic below, you can see I’ve got a lot of plugins enabled that shouldn’t be.  For example, do I really need the Windows Live Photo Gallery plugin or the Google Earth Plugin enabled?
As I said earlier, you can disable all your plugins without hurting the browser; however, if you want more information about a plugin before you disable it then you should click the details “plus” icon in the upper right corner of the browser window.  It’s right under the star icon in the far right of the location bar.
Viewing details will show you the full description of the plugin and the exact path to plugin file on your hard drive.  If you’re still not sure about it, copy and paste the name in Google and you’re bound to find a myriad of results.
Disable plugins in Google Chrome

3. Disable Extensions
Plugins and Extensions are similar in that they both extend the usability of the browser; the difference between the two is nuanced.
Plugins usually refer to third-party software that span multiple browsers.  For example, Adobe Flash is a plugin for Firefox, Chrome, IE, and Opera.  Conversely, Extensions are browser specific.  They are bits of code that modify the behavior of a specific browser in a specific way.  For example,  I talked about AdBlock in an earlier post.  It bonds with Chrome to block annoying popups.  It fundamentally changes the DNA of the browser so that it no longer permits annoying ads to inundate your screen.  The difference between plugins is subtle but the point is that you probably have extensions enabled that you should disable.
Open the address bar again and enter:
chrome://extensions
Then uncheck the extensions you think are slowing down your system.  If you decide that you don’t even need it just click the trash icon to get rid of it for good.
Disable Extensions in Chrome

4. Clear Cache
Chrome accrues a history of all the web sites you’ve visited.  It also saves page elements and all sorts of goodies so that subsequent visits to those pages load faster.  Instead of having to request the same stuff twice, Chrome just loads the content from your local system so your browser can whiz the page on the screen faster.
These autosaving features usually work well but as you continue to use Chrome the database can get large, sometimes so large that it slows Chrome to a crawl.
Fortunately this is super easy to fix.
Press Ctrl Shift + Del to open the clear browsing data screen.  By default it will attempt to flush your browsing and download history.  As well as all cookies, cached plugin data, saved passwords, form fills and App data.  It also tries to deauthorize content licenses which means that it will stop Adobe Flash from playing any previously viewed protected content such as purchased movies.  You should really only check this if you plan on selling your computer.
Google Chrome clear Cache
Clearing Browsing history purges all the web address you’ve visited, saved text from those pages, snapshots that appear on a new tab and pre-fetched IP addresses.
Wiping the download history just clears download file list not the actual files that reside on your computer.  Killing cookies deletes the small text files on your computer that include your preferences and profile information.  All the rest are pretty self explanatory.  The form fills are the autofill entries and text records in web form fields.  For example, if you always sign into the Twitter with username example then Chrome might automatically display that text when you click in the sign-in field.  Clearing form fills removes these saved entries.

5. Be incognito (Most Effective Tip)
I’ve found that the fastest browsing experiences can often happen in Chrome’s private mode known as Incognito.
Going stealth means that none of your web pages are tracked, downloaded files are forgotten and cookies die when you close the incognito tab; bookmarks remain.  Here’s how to load it Press
Ctrl Shift + N
When in doubt just go undercover with Incognito.  You can’t go wrong here.
Google Chrome Incognito

The Bottom Line (Now test your browser's Internet speed)
Although Google Chrome currently has the crown as the worlds fastest web browser it still gets slow over time.  I mean, you can have a 2014 Nissan GTR but if you don’t maintain it then the performance can start to suffer.  The goal of my post today was to show you the most effective ways to improve the performance of Google Chrome.  As long as you turn on GPU compositing, disable plugins, disable extensions, clear the cache and browse incognito you’ll be fine.  I’d be very very surprised if our browser is still slow after doing these things; in fact, I’m so confident that the above tips will fix your slow browser that I dare you to send me a comment to the contrary.  This stuff really works; I’ve done it on my version of Chrome and have seen dramatic speed improvements.  If you really want to see how fast your browser is run the freePeacekeeper benchmark test.
If your prefer Internet Explorer over Chrome, you can also speed IE9 up too.
Peacekeeper Browser Benchmark Test

ENJOY Your Internet Speed with Fastest Browser...!!!


Tuesday, January 7, 2014

TOP Free Video Players For Your Website, Wordpress and Blogs

Free Video Players For Your Website and Blogs

01. Flowplayer

instantShift - Free Video Players For Your Website
Flowplayer is an Open Source (GPL 3) video player for the Web. Use it to embed video streams into your web pages. Built for site owners, developers, hobbyists, businesses and serious programmers. Using Flowplayer, You can build your own looking player and place it on your site to stream your video from a global network.
Features:
  • It’s totally free and open source
  • You can build your player in minutes
  • Smooth as silk — It’s optimized to oprate the overall behaviour of the player to “hide” curvy edges and blocking behaviour. Timeline animates fluently and there are two different autohiding modes: ”fade” and ”slide”.
  • Stream from anywhere — Use industry standard streaming protocols RTMP or HTTP with most common web servers lighttpd, Apache, nginx or IIS or stream your videos from well known Content delivery networks Akamai, Amazon Cloudfront, Highwinds, HDDN, SimpleCDN and more
  • Extend with web starndards — Flowplayer is build with Flash technology which ensures that 98% of all Internet users can see your videos. Also there is an unique JavaScript API changes the way you communicate with Flash.
How to install:
There is a detailed installation guide available on how to build your video player.


02. Video LightBox

instantShift - Free Video Players For Your Website

Video LightBox JS is a free wizard program that helps you easily embed video to website, web page or blog, in a few clicks without writing a single line of code.

Video LightBox is FREE for non-commercial use. A license fee is required for use on a commercial website. Video LightBox Business Edition additionally provides an option to remove the VideoLightBox.com credit line as well as a feature to put your own watermark to videos.

Features:
  • Embed flv, mp4, 3gp video files
  • Add Youtube, Facebook, Google Video, Metacafe, Vimeo, MySpace videos
  • Mac & Windows versions
  • XHTML compliant
  • Automatic thumbnail creation
  • Adding caption
  • A lot of gorgeous gallery themes
  • Built-in FTP
How to install:
There is a detailed installation guide provided by Video LightBox team on their website.
OFFICIAL LINK 


03. JW Player

instantShift - Free Video Players For Your Website
The JW Player is handy and flexible flash video player. It supports playback of any format the Adobe Flash Player can handle (FLV, H.264, MP4, MP3, AAC, JPG, PNG and GIF). It also supports various streaming and playlist formats (including RMTP, HTTP, live streaming and more), a wide range of flashvar settings and an extensive JavaScript API.
Features:
  • Change the JW Player’s look & feel to match your site. Design your own or check out JW Player’s custom skin library.
  • The JW Player works out-of-the-box with Wowza’s token system so you can keep grubby mitts off your videos.
  • Good Plugins System — With plugins, your player can do anything. You can build your own with the Developer SDK and resources or browse our Plugins to pick up Analytics, Viral, Adtonomy, Rate It, and much more.
  • Hassle-free video management
How to install:
This guide will tell you how to Install the JW Player for Flash v5. First, Download the installation ZIP from web, which contains everything you need to get started.
STEP 1: Upload Player Files to Website — Transfer the player.swf, yt.swf and swfobject.js file from the ZIP to your website. Make sure that you’ve also uploaded all the necessary videos, songs and/or images to your site.
STEP 2: Embed Player Code into HTML — Embed the player in your HTML page with the lines of code below. Note: If you place the files in different directories, make sure to set the references in this code accordingly.
1<p id='preview'>The player will show in this paragraph</p>
2<script type='text/javascript' src='swfobject.js'></script>
3<script type='text/javascript'>
4var s1 = new SWFObject('player.swf','player','400','300','9');
5s1.addParam('allowfullscreen','true');
6s1.addParam('allowscriptaccess','always');
7s1.addParam('flashvars','file=video.flv');
8s1.write('preview');
9</script>
Notice the flashvars parameter above can contain a list of variables for configuring the player to use different Plugins or Skins. To quickly set up FlashVars, use the setup wizard. Simply choose an example, select the variables you want to use and paste the code onto your page. It’s that easy.
There is a detailed installation guides available on how to setup video player on your site.


04. GDD FLVPlayer
instantShift - Free Video Players For Your Website
GDD FLVPlayer is a web-based freeware to play FLV/mp4 (MPEG-4 encoded video file for Flash) files. With GDD FLVPlayer, you can easily play your FLV/mp4 videos as it doesn’t require the complicated Flash authoring tool and Flash development tools.
Features:
  • Fully customized control panel
  • Publish your FLV or mp4 video to website with a few clicks
  • Add video to any of your Flash projects in seconds.
  • Play commercials or any custom intro.
  • Use your own logo in player.
  • Use any size you want.
  • No tricks, no scams, it is totally free.
  • No special programming skills required.
How to install:
A easy howto guide comes with every downloadable player ZIP file.

05. MC Media Player
instantShift - Free Video Players For Your Website
MC Media Player is a Flash-based media player for embedding video, audio and still images in web pages. It is free to use for both non-profit and commercial websites.
There are currently two versions of the player: MC Classic (previously known as the 720×360 Edition) and MC Altair (beta).
  • MC Altair — A single-file video player designed to be both easy to set up and extremely customizable. Supports FLV and H.264 (progressive download and RTMP streaming).
  • MC Classic — This was our original player but it is now in the EOL (end of life) phase, i.e. it is no longer being developed.
Features:
  • Customizable interface
  • Can runs from MC Media Player’s server or your own server
  • Resizable in both dimensions and aspect ratio.
How to install:
There is a Setup tool available on MC Media Player’s site by which you can create your own player.

06. Video Player Pro
instantShift - Free Video Players For Your Website
Video Player Pro is one more handy free flash video player that’s easy to configure and easy to add to your website. It is free for personal use.
Features:
  • Combine All Of Your Movies Into One Great Looking Professional Package.
  • Video Player Pro Comes In Different Versions To Suit Your Needs.
  • Watch Movies The Way They Were Intended To Be Viewed.
  • No Flash Programming Needed.
How to install:
There is a very detail video tutorial available online to understand the installation and setup process.

07. VISCOM Web Player

instantShift - Free Video Players For Your Website
VISCOM Web Player is a free platform independent web video player for website, it is an easy and convenient way to add single or multiple video to any websites. including video share sites, online Training, Education and Distance Learning , your blog, Myspace, forum.
Features:
  • Support streaming flv video from your web site.
  • upport xml playlist, you may add one movie or many movie to your player.
  • Enable or Disable the video thumbnail list.
  • Support for full screen when playback.
  • Support for playback next video if more than one movie on playlist.
  • Support for Aspect Ratio Control.
  • Easily custom web player without coding knowledge.
  • High Quality Skins included. Free Youtube style, Quick time player style, Window media player style, Real player style, Standard player style.

08. SS4UPlayer

instantShift - Free Video Players For Your Website
SS4UPlayer is an Internet based flexible video player which supports both streaming and progressive download. Work on both Windows and Linux platform. It supports playback of formats like FLV, 264, MP4, MP3. It has a wide range of flashvar settings which can be set through JavaScript. The XML-based skinning functionality allows you to completely customize its colour, scrubber color and size, transperancy level, font type, font colour and font size.
Features:
  • Play/Pause, Seek, timer, fullscreen, Volume Bar, Preview Image
  • You can load your personal logo.
  • Fully Flash AS3 with classes and packages
  • Can Load your video through Flash vars in javascript or through XML File
  • Playlist support using xml
  • Both streaming and progressive download support
  • Very stable and customizable to any level
How to install:
A detailed installation guide comes with every downloadable player ZIP file. Or you can directly download the Installation PDF guide.

09. Anarchy Media Player

instantShift - Free Video Players For Your Website
Anarchy Media Player is for all those who want simplicity of use in publishing audiovisual content to the web, and what it does is it makes any mp3, Flash flv or Quicktime mov links playable directly on your webpage while optionally hiding the download link. Distributed under the GNU General Public License.
How to install:
For detailed installation please refer this LINK

10. SublimeVideo

instantShift - Free Video Players For Your Website
SublimeVideo is an HTML5 video player that will allow you to easily embed videos in any page, blog or site using the latest modern web standards.
Browsers makers are still working on fully supporting the HTML5 video specification, so at the moment SublimeVideo is still in experimental state and only works on a limited number of browsers. But the long term goal is to make it work on all modern browsers.
SublimeVideo will be soon released for free (at least for non-commercial use).
Features:
  • Full-window mode — This will maximize the video to fit the browser’s window. It can be handy if you still want to access other applications while watching a maximized video in your browser.
  • Full-screen mode — Currently only supported in the latest WebKit Nightly Builds, you can activate this mode by ALT-clicking on the full-window button.
  • HTML5 video benefits — No browser plugin, no Flash dependencies! You can also jump anywhere in the video without having to wait for it to buffer.
  • Standalone pure JavaScript library

Free Video Player Plugins for WordPress Blogs

1. WP Media Player

instantShift - Free Video Players For Your Website
WP Media Player is a Silverlight based media player plugin for WordPress that can be used for playing one or more players within the same blog post or page. It is used for playing self-hosted video files as well as for videos hosted on external video servers.
Features:
  • 6 player styles
  • Tracking and reporting on how many times the videos have been watched
  • Default player configuration settings, such as size, thumbnail, auto load and auto play.
  • Per-instance player configuration settings that can be used to customize each individual player within or across blog posts.
  • The UI for video uploading and selecting of media files that is fully integrated into the WordPress post editing UI.
How to install:
For detailed installation please refer this LINK

2. Flash Video Player

instantShift - Free Video Players For Your Website
The flash video plugin for WordPress allows the addition of video (and other media) to a WordPress website using standards-compliant markup and the leading open source software. A full options menu is available with post-level overrides for endless customization. Installation is quick and easy, and no additional setup/coding/php knowledge is required. This plugin is low footprint, creating no tables, and uninstalling cleanly. Version 5 provides full support for skinning the player, integration with Google Analytics, and the capability to display ads from LongTail Solutions.
Features:
  • Robust Options Menu for Full Player Customization!
  • Google Analytics on Video Events
  • LongTail Ad Solution Enabled
  • XHTML Compliant!
  • No Remorse! No Database Tables and Uninstalls Clean
  • Playlists, RSS, ATOM, XSPF, RTMP
  • Widget Capable
How to install:
For detailed installation please refer this LINK

3. Anarchy Media Player

instantShift - Free Video Players For Your Website
Anarchy Media Player 2.5 for WordPress will play any simple href link to mp3, flv, Quicktime mov, mp4, m4v, m4a, m4b, 3gp as well as Windows wmv, avi and asf files, in the appropriate player on your web page. The WordPress versions also add buttons to the Rich Text Editor for embedding Flash swf and Director dcr movies as well as YouTube, Google Video, iFilm, DailyMotion, Revver, Metacafe, MySpace, Apple iTunes iMix, and GoEar players.
How to install:
For detailed installation please refer this LINK

4. All in One Video Pack

instantShift - Free Video Players For Your Website
This is not just another video embed tool – it includes every functionality you might need for video and rich-media, including the ability to upload/ record/import videos directly to your post, edit and remix content with an online video editor, enable video responses, manage and track your video content, create playlists and much more.
Features:
  • Upload, record from webcam and import all rich-media directly to your blog post
  • Allow readers and subscribers to add video and audio comments, and to participate in collaborative videos
  • Manage and track interactive videos through the management console
  • Enable video advertising
  • Complete administrative capabilities. You decide who can add and edit each video
  • Supports more than 150 video, audio and image file formats and codecs
How to install:
For installation and other FAQ please refer this LINK

5. Viper’s Video Quicktags

instantShift - Free Video Players For Your Website
Tired of copying and pasting the embed HTML from sites like YouTube? Then this plugin is for you.
Just simply click one of the new buttons that this plugin adds to the write screen (rich editor included) and then paste the URL that the video is located at into the prompt box — easy as that. You can fully configure how the videos are displayed (width, height, colors, alignment on the page) and much more. Your site will even stay (X)HTML valid unlike with the code provided by most video sites.
Features:
  • Supported file types: Flash Video Files, QuickTime, Generic video files
  • Currently supports multiple big video sites like YouTube (including playlists), Google Video, DailyMotion, Vimeo etc.
How to install:
For detailed installation please refer this LINK

6. Smart YouTube

instantShift - Free Video Players For Your Website
Smart Youtube is a WordPress Youtube Plugin that allows you to easily insert Youtube videos/playlists in your post, comments and in RSS feed.
The main purpose of the plugin is to correctly embed youtube videos into your blog post. The video will be shown in full in your RSS feed as well.
Features:
  • Easily embeds YouTube videos and YouTube playlist
  • Supports latest high quality video protocols (360p and HD quality 720p)
  • Allows full YouTube customization (colors, border, full screen…)
  • Supports video deep linking (starting at desired point with &start=time parameter)
  • Works on iPod and iPhone
  • Provides a sidebar widget for videos as well
  • Produces xHTML valid code
How to install:
For detailed installation please refer this LINK

7. Embedded Video

instantShift - Free Video Players For Your Website
The plugin is made for easily embedding videos into a blog post. The videos can be integrated from external portals (like YouTube, Google Video and many many others) or they can be uploaded to the web server or a remote server and integrated as well. Additionally a corresponding link to the video on the particular video portal page or a download link to the local file can be generated automatically, if demanded. The linktext is also configurable individually. Furthermore a fixed prefix for the linktext can be determined. The videos can be integrated easily by using the built-in WYSIWYG editor. The plugin generates XHTML-valid code and works from WP 2.5.
Features:
  • file formats supported: flv, swf, mov, qt, wmv, mpg, mpeg, mpe, asf, asx, wax, wmv, wmx, avi.
  • video portals are currently supported: YouTube, Google Video, dailymotion, MyVideo, Clipfish, Sevenload, Revver, Metacafé, Yahoo! Video, ifilm, MySpace Video, Brightcove, aniBOOM, vimeo, GUBA, Garage TV, GameVideos, vSocial, Veoh, Gametrailers.
How to install:
For detailed installation please refer this LINK

8. wordTube
instantShift - Free Video Players For Your Website
This plugin manages the JW FLV MEDIA PLAYER 5.1 and makes it easy for you to put music, videos or flash movies onto your WordPress posts and pages.
wordTube supports the streaming video format (Format .flv or .swf), sound files as MP3 and JPG, GIF or PNG grafic files. With wordTube you can simply insert it into your blog with the tag [media id="media id"] or as playlist [playlist id="playlist id"].
You don’t need to change the WYSIWYG mode or special HTML knowledge to insert such a tag. You can show a simple media file (i.e. a flv Format) or a playlist of all your media files.
How to install:
For detailed installation please refer this LINK

9. ProPlayer

instantShift - Free Video Players For Your Website
Places online videos (YouTube, Vimeo, Veoh, Youku, Dailymotion, etc..) into your post by using JW FLV Player.
Features:
  • 27 different Skins
  • Custom Playlists
  • Video Ratings
  • Audio Visualizer
How to install:
For detailed installation please refer this LINK

10. SeeTheFace

instantShift - Free Video Players For Your Website
SeeTheFace’s plugin for WordPress enables you to upgrade your text blog to Video Blog instantaneously.
With the help of SiteClip users will be able to easily use Publisher’s video message recorder and filters. Moreover, the mechanism behind SiteClip makes it possible to integrate it with any kind of website, regardless of its type and complexity. SiteClip can be built-in to E-commerce, Educational/Informational and News, Community, Auction sites as well as Job Portals, in a snap.
How to install:
For detailed installation please refer this LINK

11. FLV Embed

instantShift - Free Video Players For Your Website
FLV Embed is a WordPress plugin made to simplify the process of adding Flash videos (FLV) into your blog. For commercial use and implementation, you need to purchase a license for the player. If you want information about encoding videos into FLV and why you should use FLV, Jeroen has also written an excellent article which you can find on his site.
Features:
  • Enforces a standard plugin tag style
  • Embeds an FLV file and does it the easiest way
  • Highly portable, extensible and future proof tags
  • XHTML compliant for those who cares about validation
How to install:
For detailed installation please refer this LINK